How to Equip the Tek RMD for Outdoor Use
What's a Tek RMD?
Have you see the Tek RMD yet? It's been described as a "moving standing frame" or the "Tek RMD wheelchair". It's not really a standing frame or a wheelchair actually, but it has some of the attributes of each.

Tek RMD with indoor trim fitted
A Tek RMD can allow persons with weak or paralysed legs to move easily between a seated and a standing position and then allow them to move around in their environment. Being narrower than a wheelchair it is easy to move around indoors and doesn’t take up so much space.
For most people that choose to use a Tek RMD they can enjoy a great standing posture and greatly increase their ability to stand during the day which we all know is good for health. Sitting in a wheelchair can be efficient to move around but the posture is not exactly health-giving. Standing wheelchairs exist but in order to remain stable the user must generally be tilted back and that is not a posture that people wish to remain in for too long.
In a world designed for people that can stand, the Tek RMD allows persons with a disability to be 'eye to eye' with their friends and family and participate in activities that really just make life more normal.
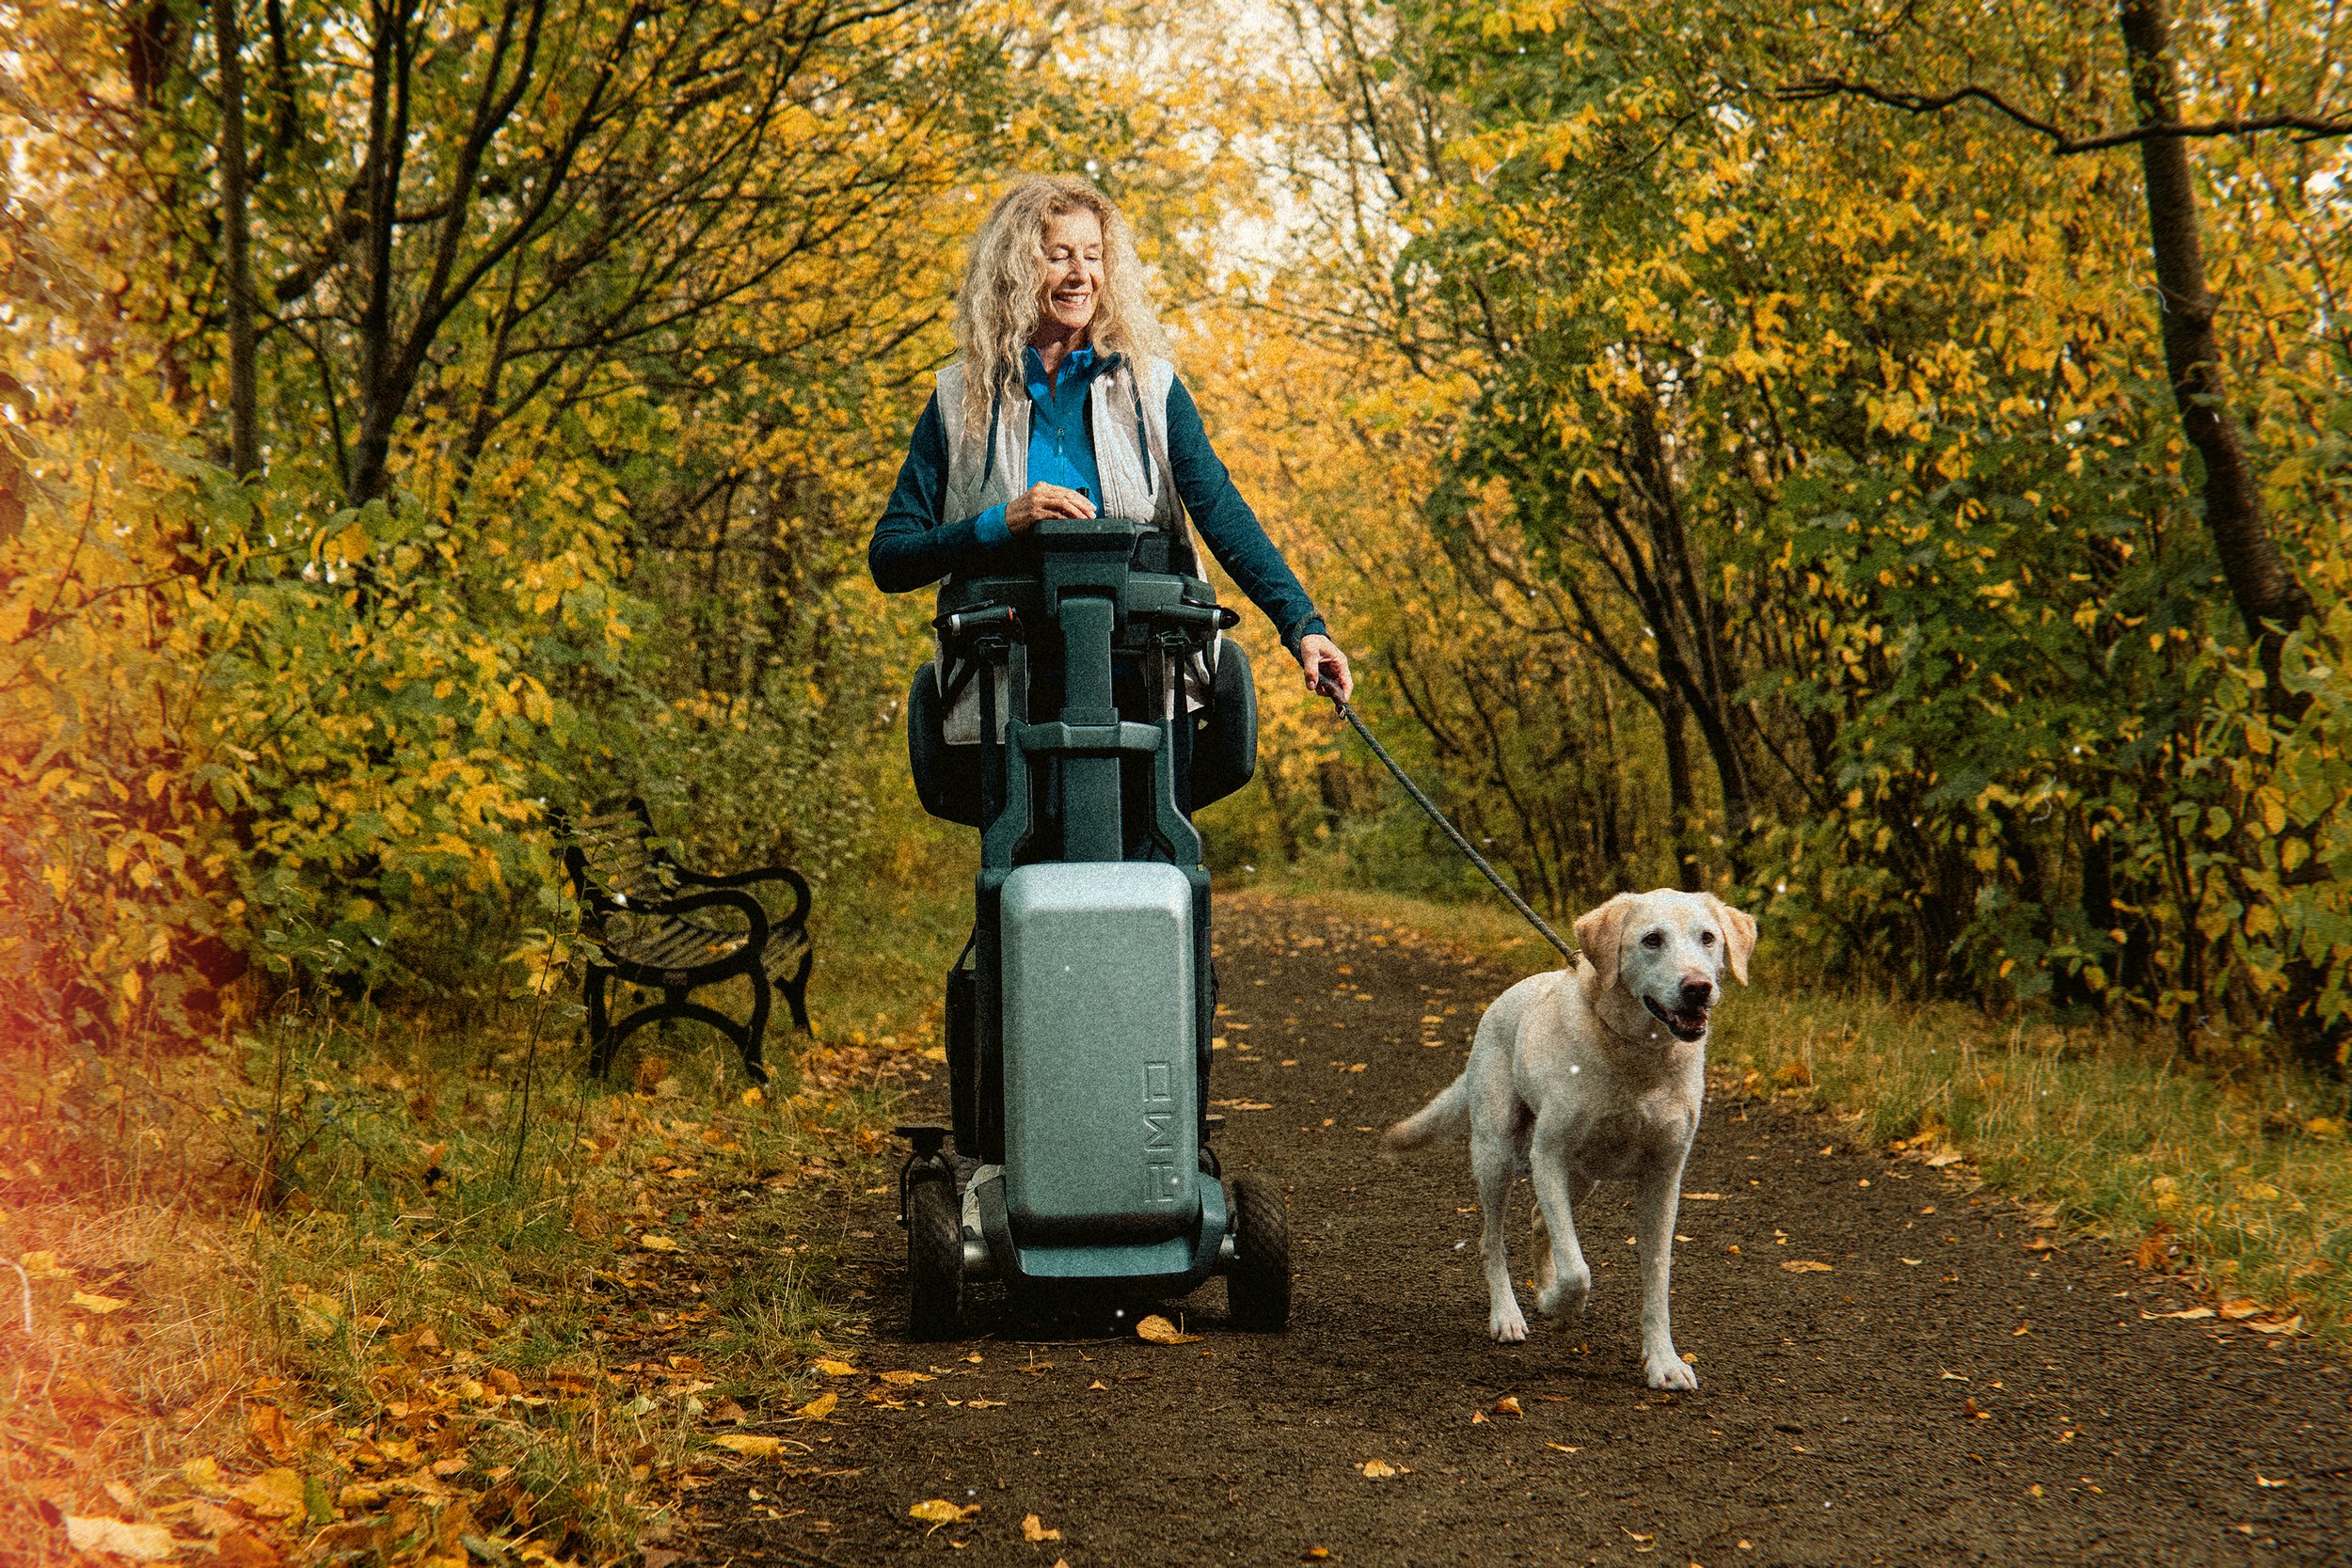
The Outdoor kit
Since we started to work with the Tek RMD we have seen some positive changes in the design. The first version was aimed very much at paraplegic users who had good upper limb strength and mobility. The user had to squeeze a lever and pull on the handlebars to get into a standing position. That's was fine for some, but we had many enquiries from persons who simply did not have the arm and grip strength to the use product.
Now the Tek RMD is only available in an electric lifter version so it suddenly became much more accessible to persons following a stroke, MS or other neurological condition. The effort of moving from sitting to standing had been eliminated by the electric lifter.
Then we have the Outdoor kit.
The original design was suitable for indoors but many users wanted to extend their use of the Tek RMD into the outdoors. With the arrival of the outdoor kit, this became reality.
The outdoor kit consists of new larger, pneumatic front wheels and a bigger tail section. It also includes the means to change from indoor to outdoor trim quickly and easily.
The video below explains how the Outdoor kit of the Tek RMD is used step by step. Below the video is the transcript if you had rather read it.
Video transcript
Hello and welcome. In this video, I'm going to show you how to change from the indoor to the outdoor wheels for your Tek RMD. You will find instructions in your user manual if you prefer. Here is what the product looks like with its indoor and outdoor trim. The outdoor trim on the right shows that the wheels extend the base of support.
Tek RMD with outdoor wheel kit fitted
It just takes a few minutes to get this in place. The unit shown here also has the optional transfer seat fitted. We will cover this in another video and won't discuss this further here. Here are all the components of the Outdoor Wheel Kit, so before we start let's make sure we have everything available.
Starting from the top we have the alternative rear tailpiece, the outdoor front wheels, the spanner for the front wheels, the lift platform and the two parts of the handle for the lift system. Before going any further, please check the tyre pressures on all four wheels. This is important to avoid damaging the inner tubes of these tyres.
The pressures should be 50 psi for all the wheels. If you need to top up the pressures you will find an adapter in the toolkit you were provided with at your delivery. Next, take a look at the sticker on the lift platform. The sticker reminds you that when you have the outdoor wheels in place, the upper arm of the Tek RMD should be in a slightly flexed position.
There is a label at the base of the upper arm that is revealed as the arm lowers. You need to be able to see at least some of the orange label when the outdoor wheels are in place. We recommend you just lower the arm a little now before using the lift platform. Now move the lift platform around the front of the product.
It is heavy, so take care. Next, assemble the handle by screwing the two pieces together and then carefully screw the handle into the hole on the lift platform as shown here. Make sure that the handle is vertical while you do this. Now slide the lift platform under the front of the Tek RMD as shown and push down on the lift handle.
It takes very little effort to push down the handle. Once you have done this, the wheels of the Tek RMD are clear of the floor. Now we can change the tailpiece. If you look at the tailpiece between the footplates you will see a pin protruding. Pull this pin up. You can now pull the whole of the tailpiece backward and it will slide out.
If you now bring the outdoor tailpiece forward, you will see they both have the same pin connector mechanism. You can now just slide the outdoor tailpiece into place. It's much heavier than the indoor one so please take care. Slide the tailpiece forward and then push down on the pin so that it engages correctly with the hole in the frame.
It's important that this is engaged properly. Now we can change the front wheels. First, we will change the right hand wheel when viewed from the back. Now you need to turn on Bluetooth and use the small remote control. Insert the head of the spanner so it engages with the wheel nut. Now here is the clever part.
Hold onto the spanner and press the forward button on the remote control. This engages the forward drive of the wheel and has the effect of loosening the wheel nut. The thread is fine so you need to do this for maybe 30 seconds. The spanner has a magnet so when the wheel nut is loose, it is retained inside the spanner as shown here.
You can now slide off the indoor wheel and install the outdoor one. The shaft has a keyway on it as shown here and each wheel has a pin that must engage with this. Just line up the pin with the keyway and slide the wheel into position. To secure the outdoor wheel, use the spanner along with the retained wheel nut.
For this right side wheel we now must hold the spanner in position and press the remote control reverse button. This has the effect of tightening the wheel nut. Keep going until you feel the pull on the spanner. It's important to remember that for this right hand side, we must use the forward button on the remote to loosen the nut, and the reverse button to tighten the nut.
For the left hand side the process is identical except that to remove the wheel, nut we have to use the reverse button, and to tighten the nut we have to use the forward button. When both wheels are in place and the nut's tightened, you can lower the lift platform and slide it out. To install the indoor wheels again, the process is identical.
I hope that is all clear. Remember, you can find written instructions inside your user manual and contact us if you have difficulty with anything.
Conclusion
In conclusion, the Tek RMD outdoor kit offers not only an enhancement to your mobility, but also a gateway to a whole new world of outdoor adventures. It’s not an “off-road” conversion but it is nevertheless a useful enhancement for many people.
With easy and clear steps laid out in the video and user manual, transitioning from indoor to outdoor mode has been made as simple and user-friendly as possible. Remember, the freedom to explore is now at your fingertips. Always feel free to reach out to us should you need assistance, and let your journey begin with the Tek RMD outdoor kit.